

Why Add Solar?
Good question. The total cost of upgrading the battery bank to 510Ah of LifePo4 batteries was nearly $4,500 including the batteries and miscellaneous parts and tools. The parts for the solar installation added an additional $2,500. Additionally, we also invested in updates to the inverter including battery monitoring and auto generator start during the renovation at Premier Coach Works. This cost an additional $3,500 including labor.
The sum total of $10,500 is a lot of full hook-up nights. For some people, this could be a couple of years of RV stays.
We added solar and battery for several reasons.
- The capability will give us greater independence and quality of life when staying at state and national parks where hookups are not available. Since the existing flooded batteries charge much slower and have less capacity than the LifePo4 bank, we would be running the generator 6-8 hours a day without full hookups. The new batteries and solar package could survive without running the generator on most days. On days when we need to crank on the generator, we could get away with running the generator for 2-3 hours.
- As we replaced the Dometic 3-way refrigerator with a residential model, our daily power consumption will increase by at least 100Ah. With an increased demand for power comes the need for a larger battery bank.
- As we replaced our propane cooktop with an induction cooktop, we needed the capability to pull more amperage safely from the batteries without starting the generator. With the increased demand for AC power comes the need for a larger inverter.
- We could get a 30% renewable tax credit on the installation. Essentially for the cost of the batteries and solar installation, we get the solar installation for free!
- Well, solar is cool! We had it on our old sticks and bricks house. Few things get a middle-aged homeowner more excited than watching the electric meter on the house run backward.
The Basics of the Setup
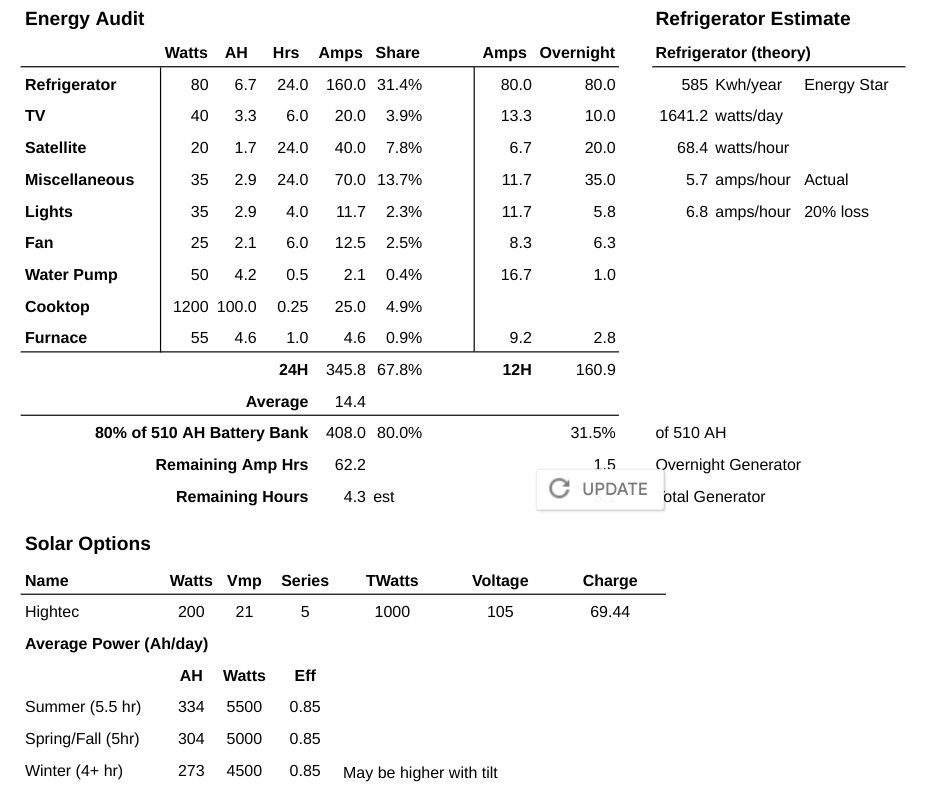
Energy Audit
Before deciding how much battery capacity to install, we needed to know how much we would use. We researched a lot of sites on the average power consumption of devices. We looked up the Energy Star rating on the refrigerator. We looked at the audit of other installations and reviewed the YouTube videos of other RVrs real-world experiences.
We then built a spreadsheet summing up what we expected to use overnight and in a 24-hour period. We also added to the spreadsheet how long the battery bank would take to recharge based on the installed Magnum MSH3012M inverter and possible solar options.
The analysis told me we would want at a minimum 400Ah and preferably 500Ah of LifePo4 battery capacity and 800 watts to 1000 watts of solar capacity.
Batteries
The existing location held four GC2 6-volt batteries providing approximately 420Ah of 12-volt capacity. Since the batteries are flooded lead-acid, they are in a vented bay exposed to the extremes of outdoor temperatures.
We wanted to minimize the rewiring from the existing location and not relocate batteries and inverters to a new spot in the RV. Relocating the batteries and inverter would add a lot of labor costs and possibly change the available storage.
Researching the batteries available in 2019, some manufacturers had low-temperature cut-offs to prevent charging the batteries in freezing temperatures. Battle Born was the only manufacturer at this time I found with a GC2-sized battery with this capability. This maximized the space, permitting 400Ah of capacity to be installed in the same location as the flooded batteries. A few other manufacturers had low-temperature cut-offs, but at best we could fit 300Ah in the same space.
Directly above the battery bay of the Newmar Ventana 3961 is a relatively large storage area that is inconvenient to use. The area is 15 inches wide by 27 inches in length and could fit a larger battery bank in a climate-controlled space with minimal rewiring. Placing the batteries inside also added a bit of security as they are not exposed through an external bay door.
Watching for a sale, I came picked up three 170Ah Renogy LifePo4 batteries for less than $4,000 with tax and shipping. This gave us the 500+Ah goal. Even though they would fit in the existing battery bay, we elected to move them to the storage area above the battery bay. The batteries do not have a low-temperature cut-off and need to remain climate-controlled for charging.
The Renogy batteries cannot be connected in series for higher voltage and also have a lower recharge and discharge rate than other batteries of similar capacity. These issues are not a concern and we do not need to connect in series and the recharge and discharge rates are within the boundaries of our needs.
Solar
Just like figuring out where to put the batteries, the layout of solar on the roof needed to be simple. The primary issue was not the layout of the solar panels, but the wiring through the roof to the charge controller and batteries.
We eventually decided to route all of the roof wiring to the back of the RV and place the charge controller in the closet above the LifePo4 batteries. The layout allows for easy access to wiring from the roof to the batteries. The most significant issue with this layout is the voltage loss from the solar panel furthest from the combiner box on the roof. The 25-foot wire length from the solar panel to the combiner box results in a 2.25% voltage drop at the 200-watt panels peak output of 9.5A. This would be before the additional line loss between the combiner box through the charge controller to the battery.
We consider the loss acceptable for our usage compared to the labor required to minimize all of the wire lengths by relocating the batteries and inverter setup. In the end, the 1000 watts installed on the roof should provide 250+Ah of renewable power every day in the winter and 330+Ah in the summer assuming 85% efficiency from the rated solar array capacity. The 85% rating assumes loss from sun angle, line loss, and conversion through the charge controller.

Performance
Performance so far is pretty good. On a day in late March just after the Spring Equinox, I calculated the daily energy production at a location in southern California was about 310 amp-hours.
I figured this out by turning on the inverter and allowing the coach to run overnight for several days in full sun in front of my house. With the system at a full charge near sunset, I consumed 120-130 amp hours overnight with the residential refrigerator running. At around solar noon the next day, the battery bank was back to 100 percent having generated about 1800 to 2000 watts since the sun came up. Peak output this time of year was over 700 watts without the panels being tilted. I doubled this number to 4000 (watts) and divided it by 12.8 (volts) to determine the estimated output for the day as 312 amp-hours.
Not too shabby! This test shows my performance expectations for the solar array are accurate. Now we just need to find a time and place to go test my calculations for the energy audit and the overall boondocking performance.


